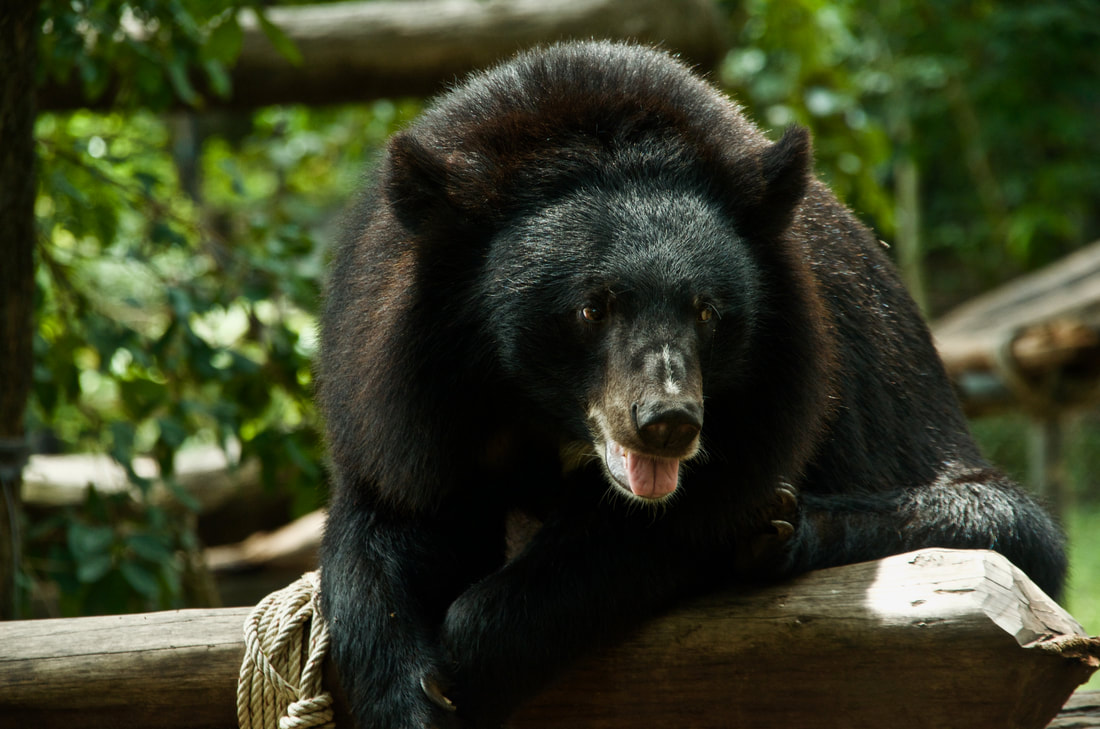
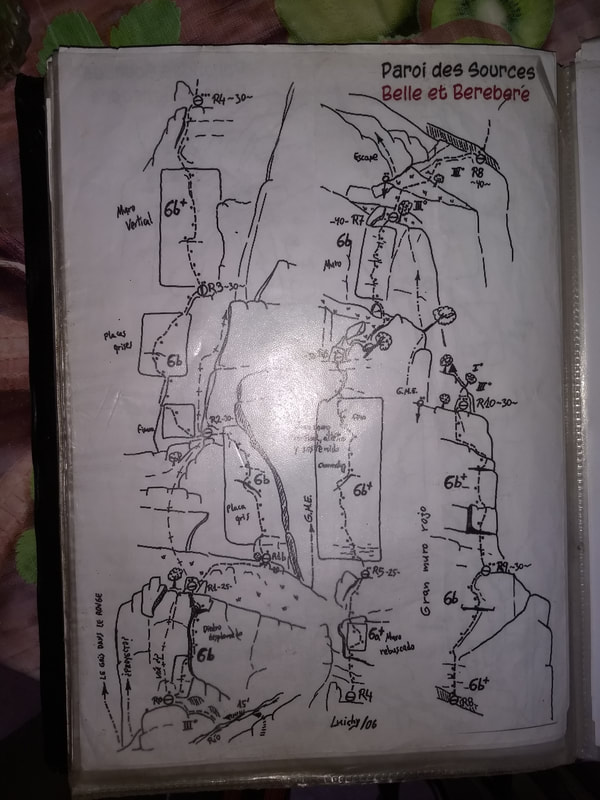
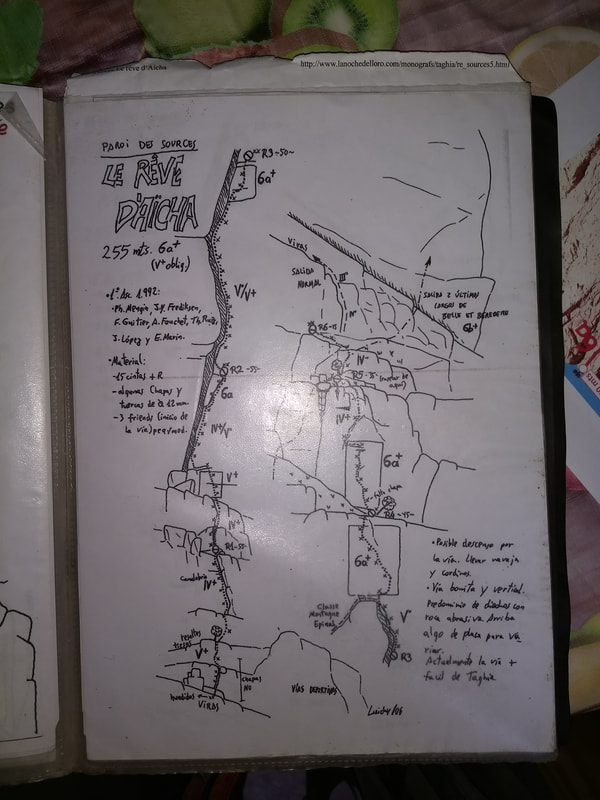
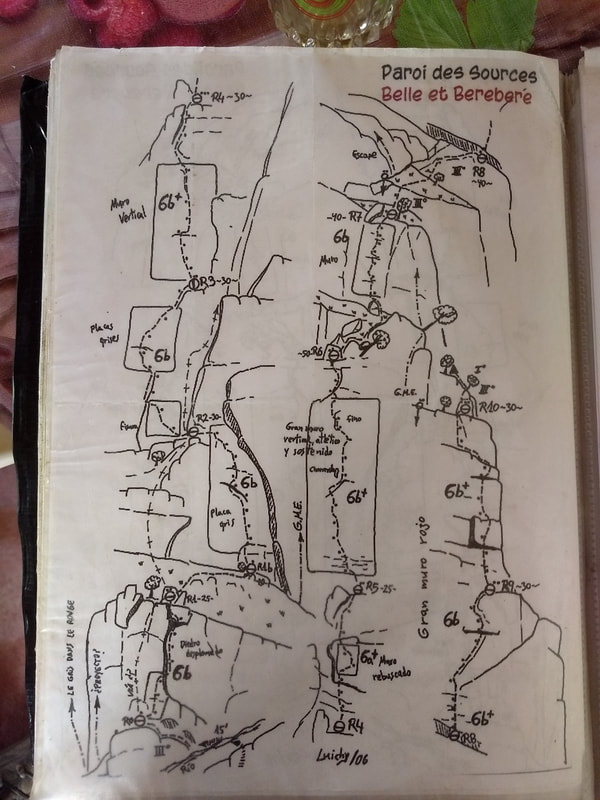
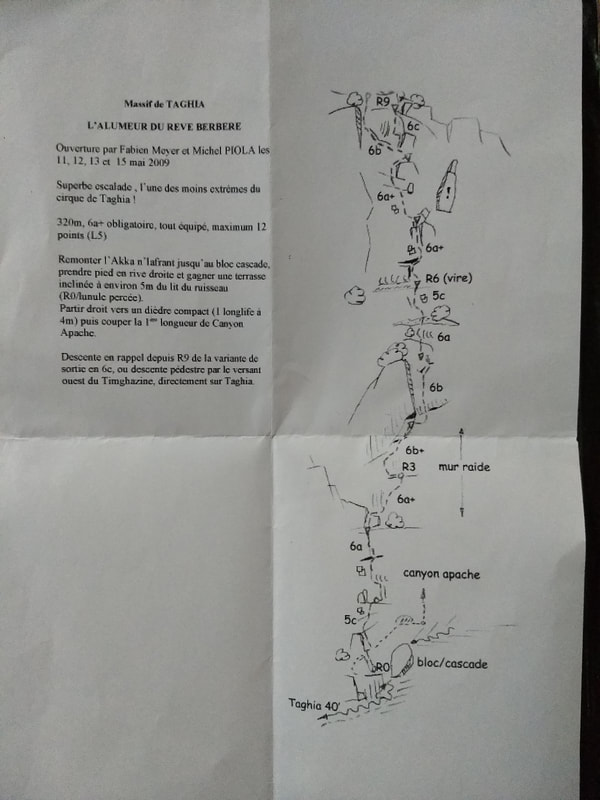
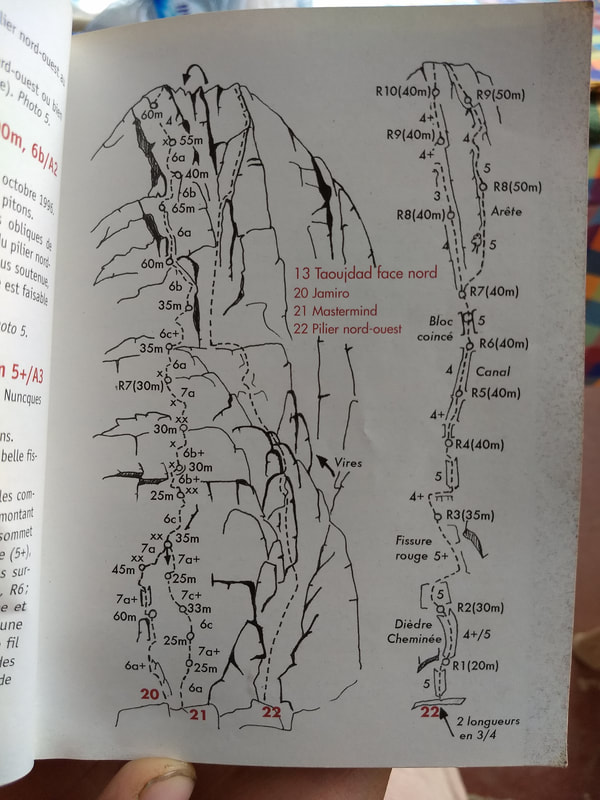
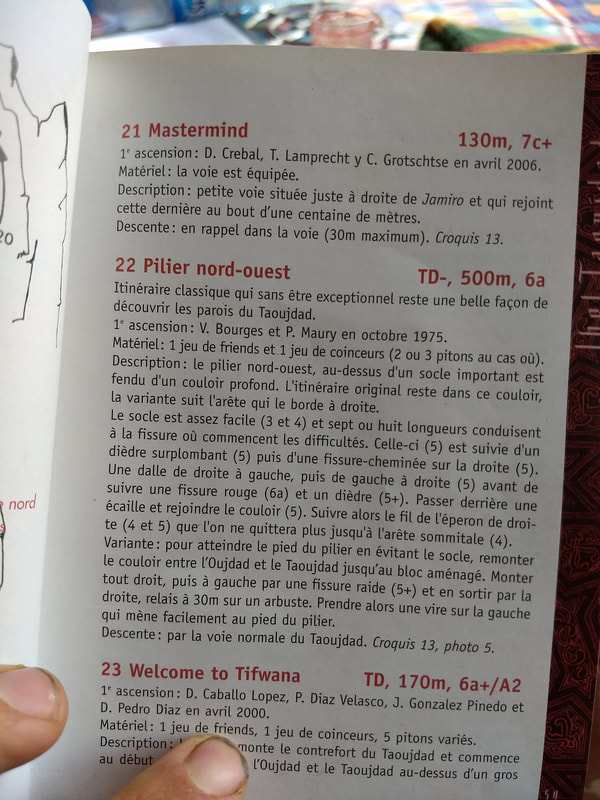
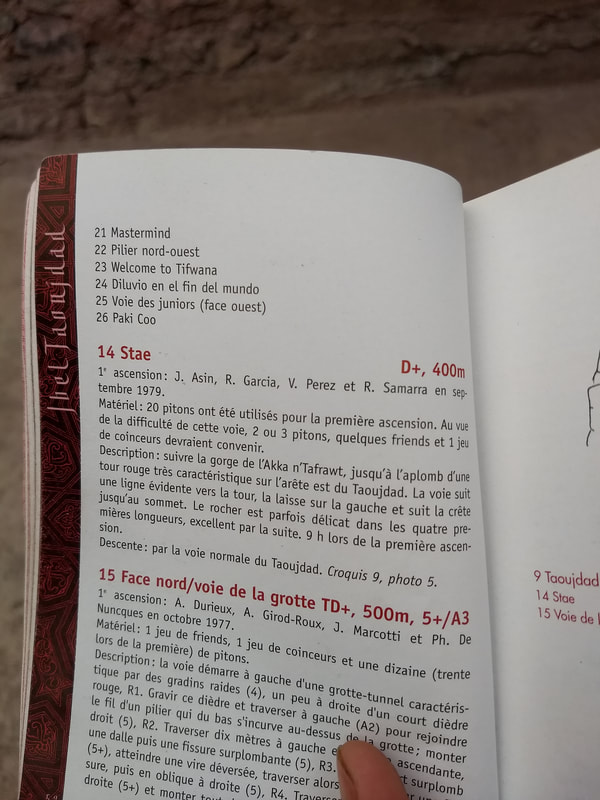
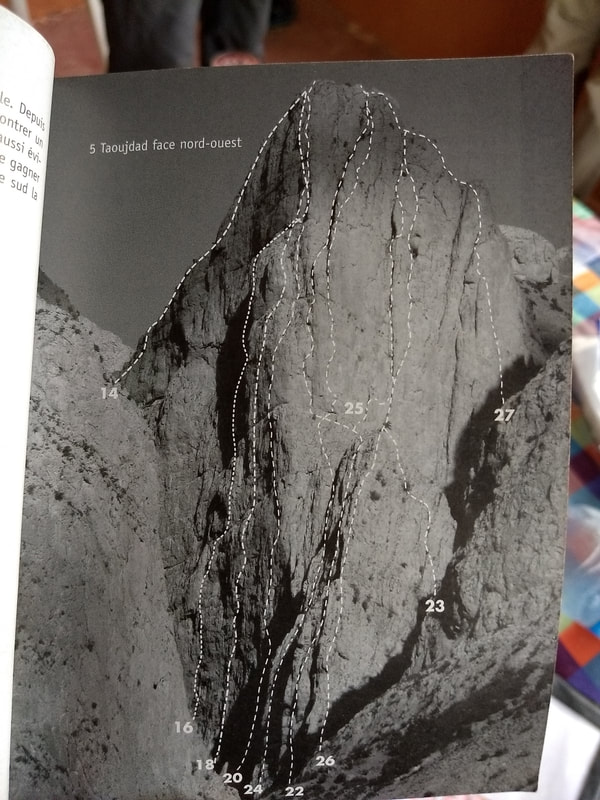
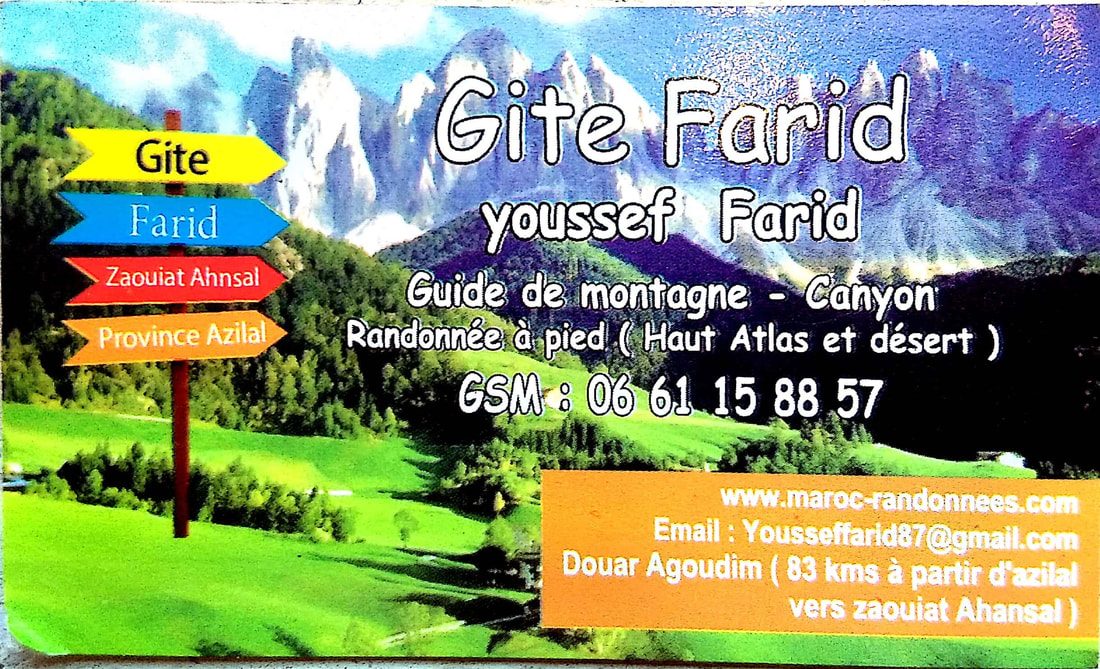
 Moon Bear Last week Alice and I were fortunate enough to work with Free the Bears Fund in Cambodia. A fantastic NGO doing amazing work. We helped Little Planet bring 80 students to carry out service work and undergo experiential learning to see how NGOs operate. A very interesting week. If you want to find out ways in which you can help or eve njust read more about them visit: https://freethebears.org/ 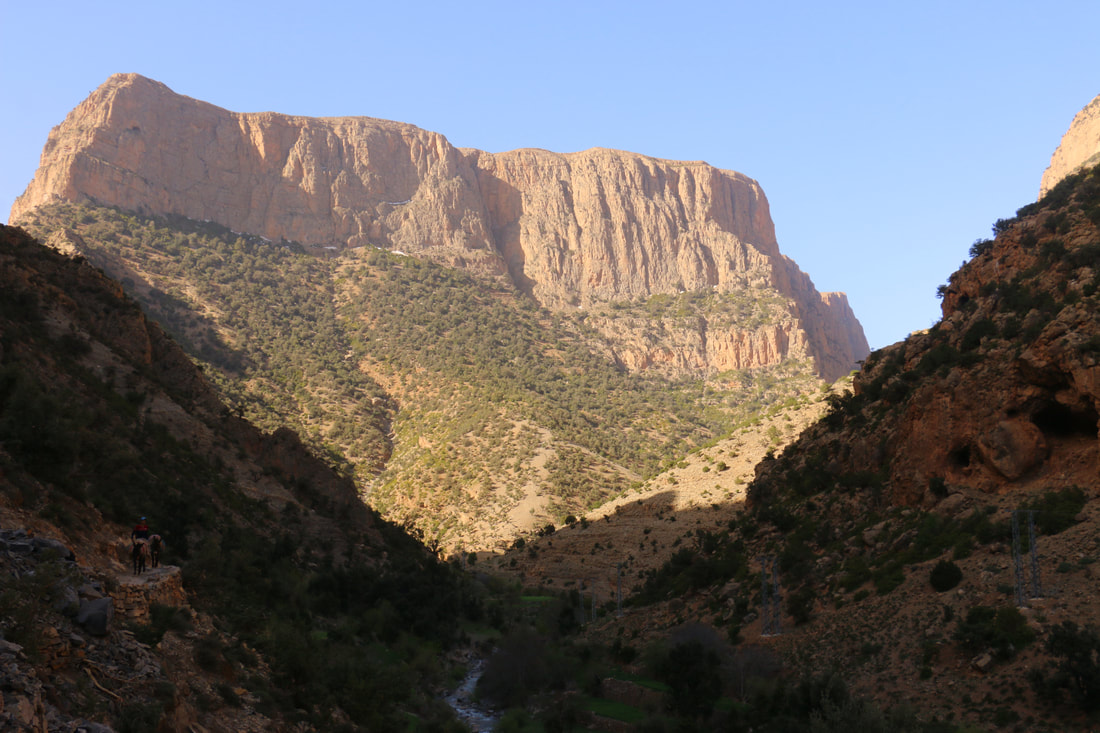 Overview: Tahia, is one of the worlds most spectacular climbing destination, with fresh streams bursting out of mountains and more big wall climbing than you can shake a stick at. However, there is very limited information out there in English. So if your planning a trip to Morocco here’s how to get there and what to expect: Getting There Starting your trip from Marrakech you can hop on a local bus to Zaouit Ahansal, roughly 3 hours, alternatively you can travel to Zaouit Ahansal from Oaouizeight, which although closer took us 11hours… Zaouit Ahansal: https://goo.gl/maps/fmQG4SRL8BM2 Once in Zaouite cross the bridge and turn right, it's a short 5 min walk to the guest house. Here you can arrange a donkey to transport any bags/gear you have to Tahia. This should cost 100DH. It’s only about a 2-3 hour walk. One of the most beautify walks I’ve ever seen, it’s quite unbelievable. Once in Tahia there are several Guest Houses. The one we stayed at had some of the best food we’ve had in Morocco and was 120 a night including food. You’ll find the guest houses have print outs of French guide books, so if your French isn’t too hot download google translate. This area of the Atlas has more to offer than climbing with breathtaking hikes across the Atlas range or spectacular Canyoning with some of the purist waters in Morocco. The Climbing This is all big wall climbing with the small climbs around 8-10 pitches. There are some bolted routes, but even on these it's nice to have a few cams/friends. To get the most out of your visit take Trad gear. Here are some pictures from the French guide books we used (These are by far the easiest of the climbs there):  Weather/Season March, April, May, June are the prime months with the weather getting rather hot from June onwards. The weather can be unpredictable no matter what time of year, with big storms coming in that last days. Unfortunately that's the nature of the Atlas mountains. When it's good, it's good! With dry air and clear, long days and clear skies. What to Bring Guest houses are affordable ranging from 100-150 a night (usually with food included) so no tent needed. Food - It is limited due the remoteness, so bring so luxury items i.e. chocolate and nut. Head-torch - Most climbs will see even the fittest climbers finishing after sunset so bring a USB chargeable head-torch as buy batteries will prove difficult. Helmets - There's a lot of loose rock in Tahia and normally other climbers not to far away so Helmets are essential. Rope - Pitches are as long as 60m often so two half ropes of at least 60m. Trad Gear - There are bolted routes so it is possible to go without Trad gear, but we struggled. As a minimum bring some friends/cams. First Aid - You are a long way from medical help so bring some first aid. Translation - Not many people speak English so some form of translation to French is useful. Contacts Here are two Cards one for a guest house in Tahia, and the other for a local guide. China’s growth is so rapid it’s hard to pin point certain restaurants or anything manmade for that matter; anything can change from one week to the next. I lived in China for 1 ½ years and this is what I would recommend to anyone thinking about going there. These locations have something for everyone from extreme climbing to Streets paved with bubbles. Top General Tips Never get in and unmarked taxi. Taxi drivers are F#^*ers, the unmarked ones are worse. Never get in without first confirming a price. Trains are great, use them when you can. Flying is super cheap and easy. Hong KongThings to do
Head up to the peak. Use the tram, it’s a pretty unique experience. Go shopping Take a walk down Jordan Street. Here is a useful blog: https://theculturetrip.com/asia/hong-kong/articles/top-10-things-to-see-and-do-in-jordan-hong-kong/ NIght Life
Drink starts in the day time in Hong Kong. One of the best things to do it get some friends together and go out on. Here is a useful blog for that: https://www.sassyhongkong.com/junk-trip-guide-hong-kong/ When the sun goes down there is no shortage of great rooftop bars and underground clubs. Hong Kong has one of the best Night Life Scenes in the world, with places open all night and great music. Accomidation
Food
Go local and go fancy at least once to experience the real Hong Kong. I Head to Temple Street Market for some night time street food https://www.google.com.hk/maps/place/%E5%BB%9F%E8%A1%97%E5%A4%9C%E5%B8%82/@22.3065185,114.1677918,17z/data=!3m1!4b1!4m5!3m4!1s0x340400eaf30bc0cd:0xb7dd432faf8433a4!8m2!3d22.30732!4d114.1702223 The Australian Dairy company is great place for a quick bite in the morning. Don’t let the queues put you off they go down quickly https://www.google.com.hk/maps/place/%E6%BE%B3%E6%B4%B2%E7%89%9B%E5%A5%B6%E5%85%AC%E5%8F%B8/@22.3045897,114.1683269,17z/data=!3m1!4b1!4m5!3m4!1s0x340400eb9fc364e3:0xe88a545468587934!8m2!3d22.3045897!4d114.1705156 Yangshou, GuangxiProbably the best town in China. This small gem has it all from high class Hotels to world class climbing. You can live here as cheaply as you can anywhere in the world. Things to do
Night life
Accomidation
FOOd
Dali, Yunnan One of the great thing about Dali is that many foreigners settle here which means when you need a break from madness you can find good food and English speaking people. Things to do
Three Sisters Temples - there's a cheap entry fee for the day, but well worth it.
Night life
ACCOMIDATION
FOod
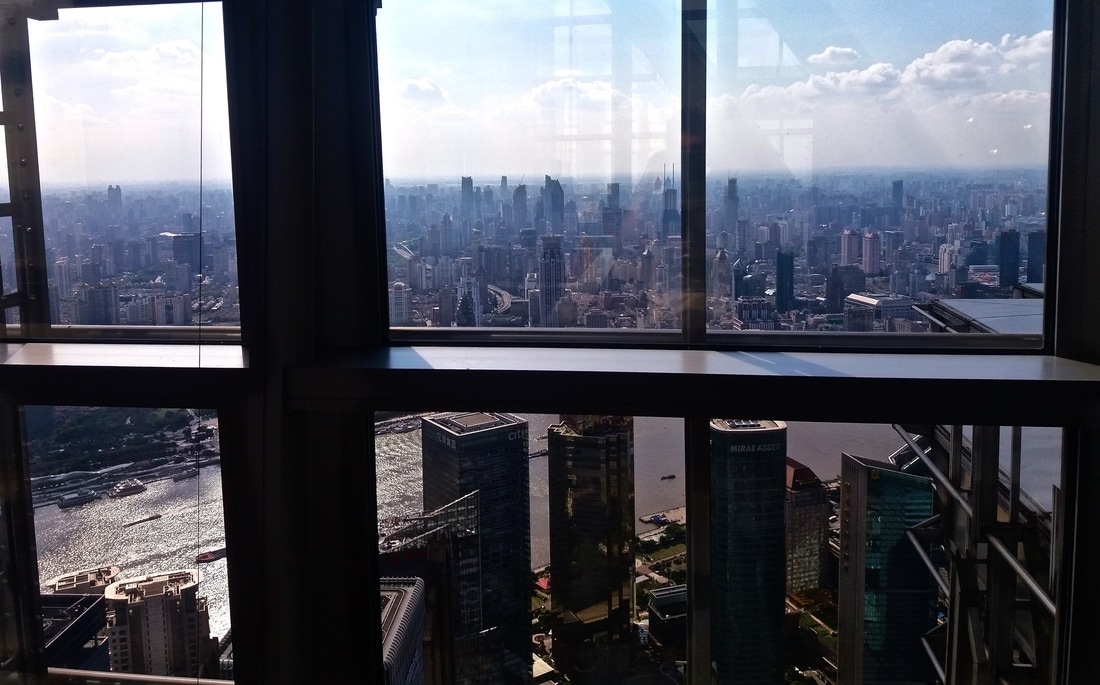
Shiang Hai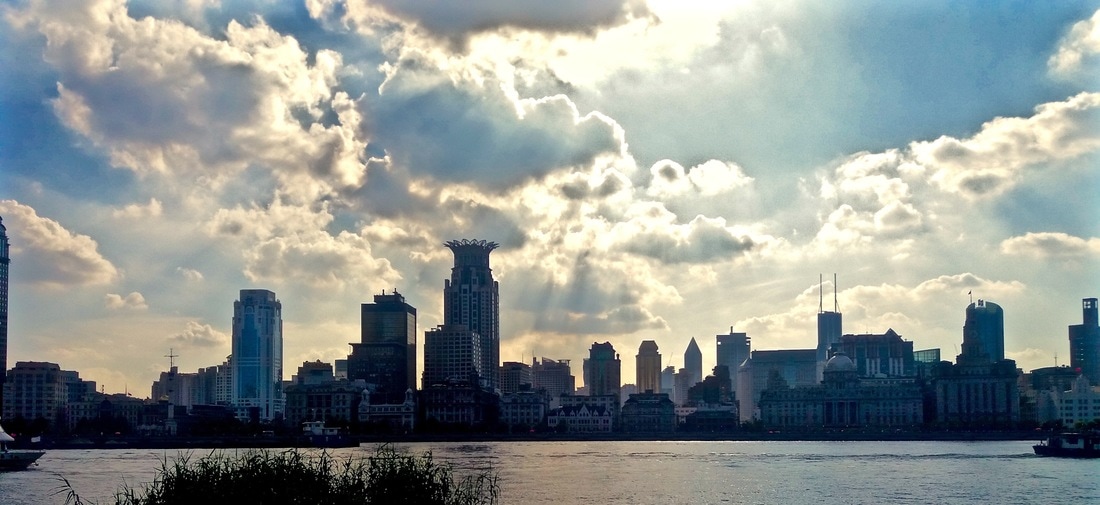 Shanghai has such a buzzing night life it’s worth going nocturnal. Shanghai has 170,000 registered foreigners making it as metropolitan as any major world city. On a clear day the city landscape is truly spectacular. While it is polluted, there are clear days and many ways to avoid the bad ones. Things to do
Nanjing Road/ Nánjīng Lù (南京路) is a must visit. I’ts the most famous and expensive street in the city. However, just off this tourist trap the small streets and allies are full of amazing local restarts and finds. NIght life
Accomidation
Food
I have spent 8 years on the river recreationally and professionally. As a swift water rescue instructor one of the repeat conversations I have is ‘what should be in a personal floatation device (PFD) or buoyancy aid (BA). Here is what I believe you should have and why. As a rescue 3 instructor I teach that everyone should have as a minimum a:
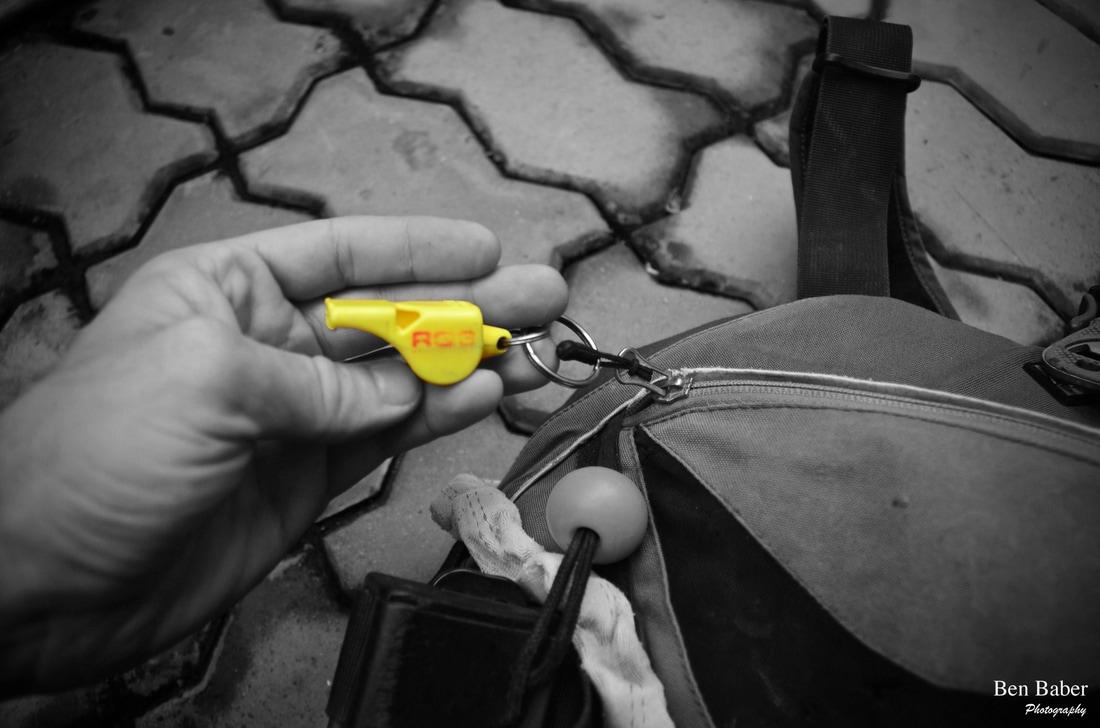 Whistle What kind? A loud whistle with no moving parts such, as a fox 40 is ideal. when whistles with moving parts get wet they tend to be less effective. Where? Within easy reach of your mouth. The zip on my PFD is perfect as it reaches my mouth in very position. 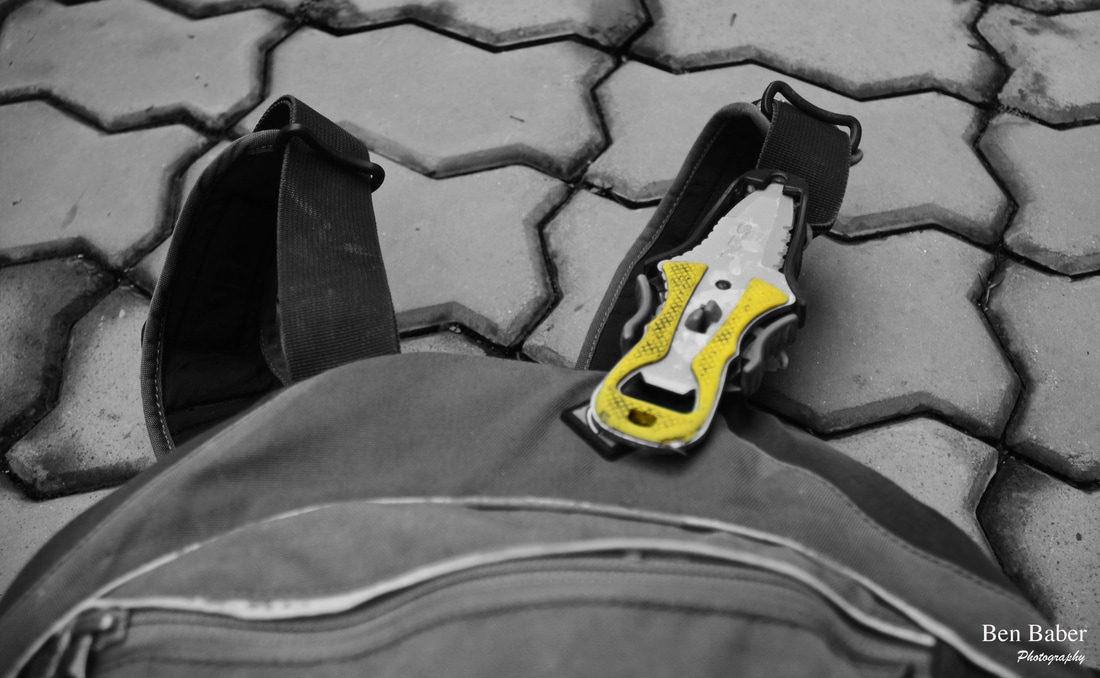 Knife Where? Although I have been on the fence in the past about having it inside or outside my preference is outside, but be very careful where you place it. It’s very common for a raft guide to lose their knife when climbing back in the raft as they have a tendency to catch on anything available. With this in mind there is only one place I’ll put mine and that’s on my left shoulder strap. This means I can reach for with one hand, and as I’m right handed this gives me the best chance of a smooth release. What kind? Blunt tip- Any knife I use on the river will have a blunt end. Using a pointed blade comes to too many unnecessary dangers. Quick Release – a quick release is essential for as I know when I need a knife it will be when time counts. As important is a strong quick release as if the mechanism for the release is weak you’ll lose that knife before you can use it. 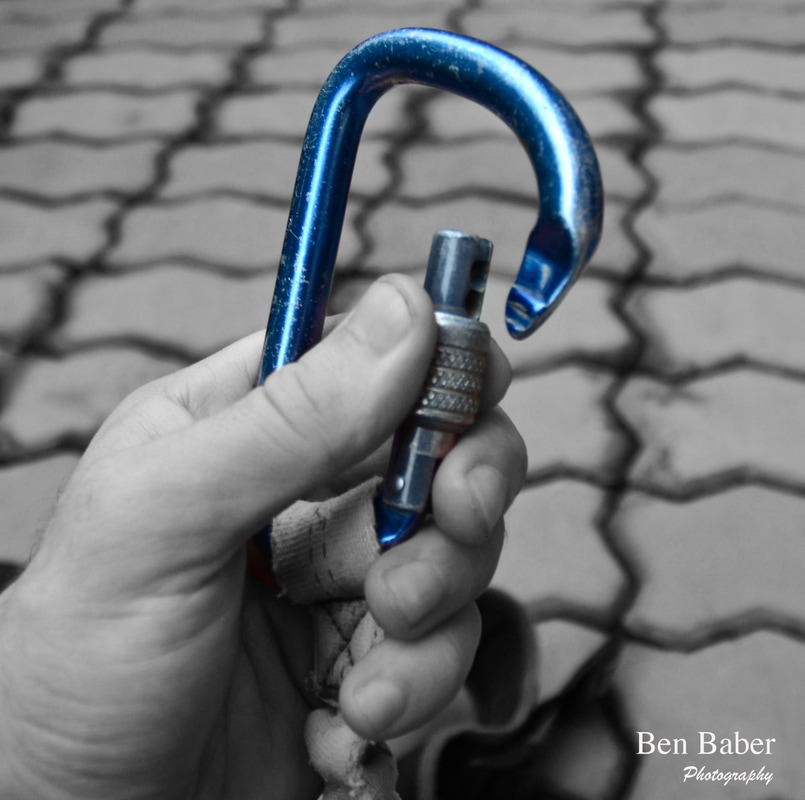 Cows Tail What kind? Keep it simple, rated and short enough for purpose (i.e. if you’re not a sea kayak guide you don’t need a 6m tail). Minimize looks and knots and make sure there’s a locking carabiner on the end. Where? Attached to the quick release harness (using an O ring), if you don’t have a quick release, don’t use a cows tail.  Carabiners? What kind? 1st they must be locking Carabiners. I would question paddling with someone that used none-locking. I believe these are most dangerous when in a raft. The risk is that the gate can open and catch around anything they press upon, such as the outside line (a rope that runs around the outside of the raft). I have seen this happen to people getting back in a raft, but what if this happens when the raft is upside-down, likely game over at this point. 2nd Where? For the 1st reason mentioned in “what kind” I only attach carabiners to a quick release mechanism, as shown in the picture where it is attached to a quick release harness I always have one attached on the outside for a speedy use the rest in the inside. Gravity load when possible There are many vibrations and constant nocks on the river so gravity loading Carabiners when possible helps to ensure they can’t open accidently. To do this simply face the gate so that when you screw it closed you screw towards the pull of gravity.  Cable ties- I keep several in my PFD. They are one of the most useful items to have. I have ended up using then constantly, sometimes for simple task like attaching a GoPro for a customer or repairing a outfitting in a kayak. Pulley
Where? Inside. I have seen people wear them on the outside and this cause considerable wear and tear. What Kind? Small, but still able to use a 10mm rope. Make sure they’re rated, because if you do have to use them they’ll be taking large forces. The problem with pulleys is you start to rack up weight at this point so I carry one, because I still want to float.  The bend test (Multi directional impact protection) - When buying a whitewater helmet I use the bend test to show how much protection it’s going to give by simply placing my hand on the sides and pushing. If it easily bends, this is bad news for your skull. The more rigid it is the more impact it’s going to take. 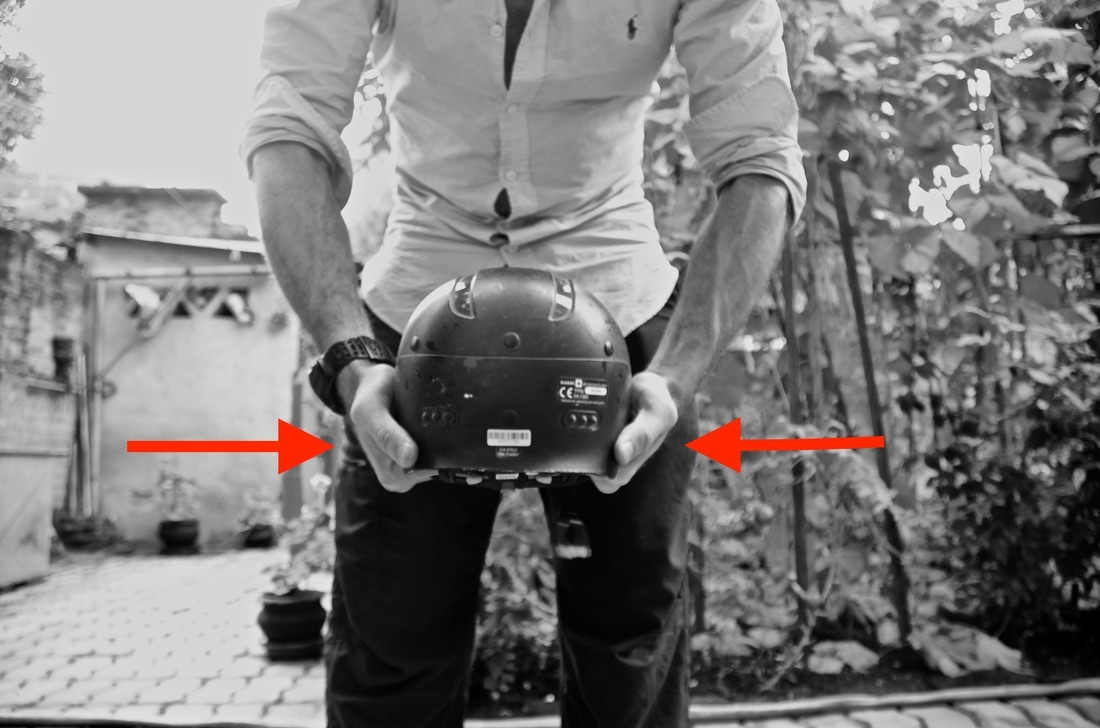 The arrows show the inward direction direction of force needed to test how well protected your head will be. Padding: Simply put the more padding the helmet has the more protection you have. Some helmets on the market offer a shell and nothing more. I like to think of my head as an egg; if I were to send it down a rapid I’d pad the shit out of that egg. Don’t go cheap: A helmet is one of the most important pieces personal protective equipment in moving water. An impact to the head in moving water comes with a very real possibility of serious injury or death. Even with a helmet on serious injury might not be avoidable; with this in mind give yourself the best possible chance and pay a little extra to be a lot safer. Higher end helmets come with the high price tag often due to newer technology used, such as carbon fiber. Ear protection: Whitewater creates a lot of noise, making hearing difficult at the best of times. Covering your earls will only make this hard, so much so that it can cause you to missing vital communications (such as “there’s a log across the river!”) or whistle signals. I would only a buy a helmet with removable ear protection or none at all. Visor: Pros
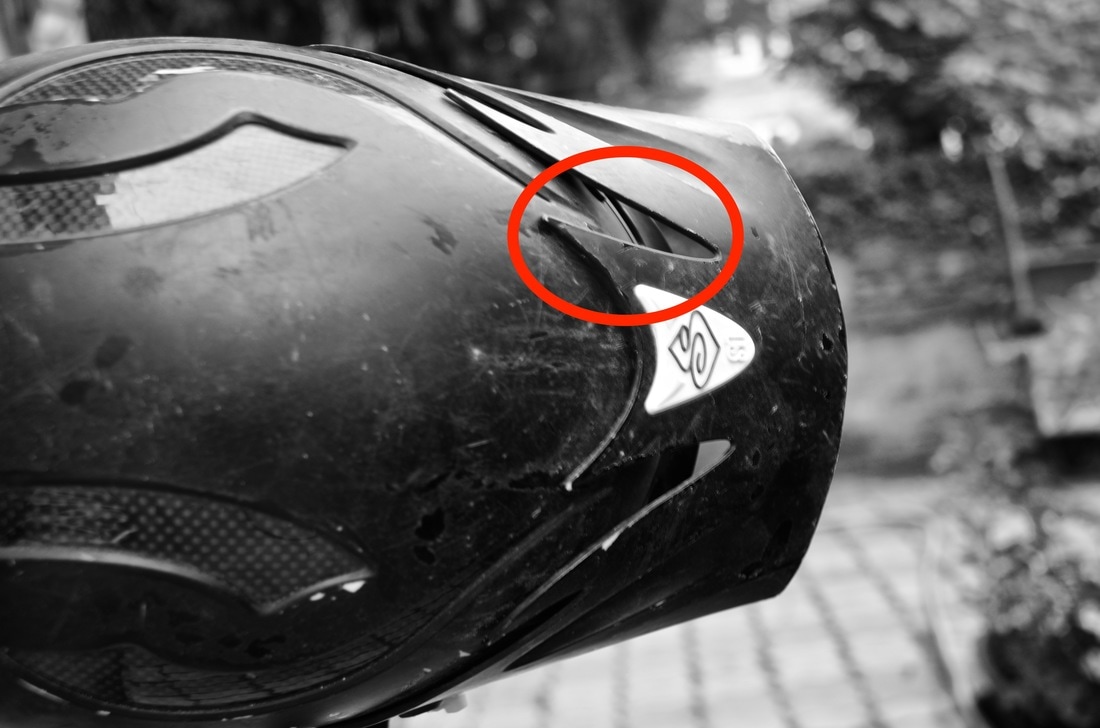 Drainage hole in a visor Fit: Make it’s snug. There should be no movement once the helmet is correctly fitted. Try some head banging once it’s on, if it come loose you stand no chance in a rapid. Chinstrap: These buggers have a habit of coming loose on the river. Make sure there is a back up lock for the strap. When adjusted correctly it shouldn’t be able to slide above your chin. Full-face: Some helmet offers full-face protection. While this isn’t something I have ever opted for I would recommend this for anyone that has trouble tucking in when the roll or anyone looking to head down some major slides. Rivers a often remote and ones your face is bust up that’s game over and invariably a long hike out. The down side being that it will restrict verbal communication often cover your ears and mouth. Summary: Don’t cut corners. Spend a little extra getting a good fit and strong helmet that’s fit for your purpose. Written by: Ben Baber 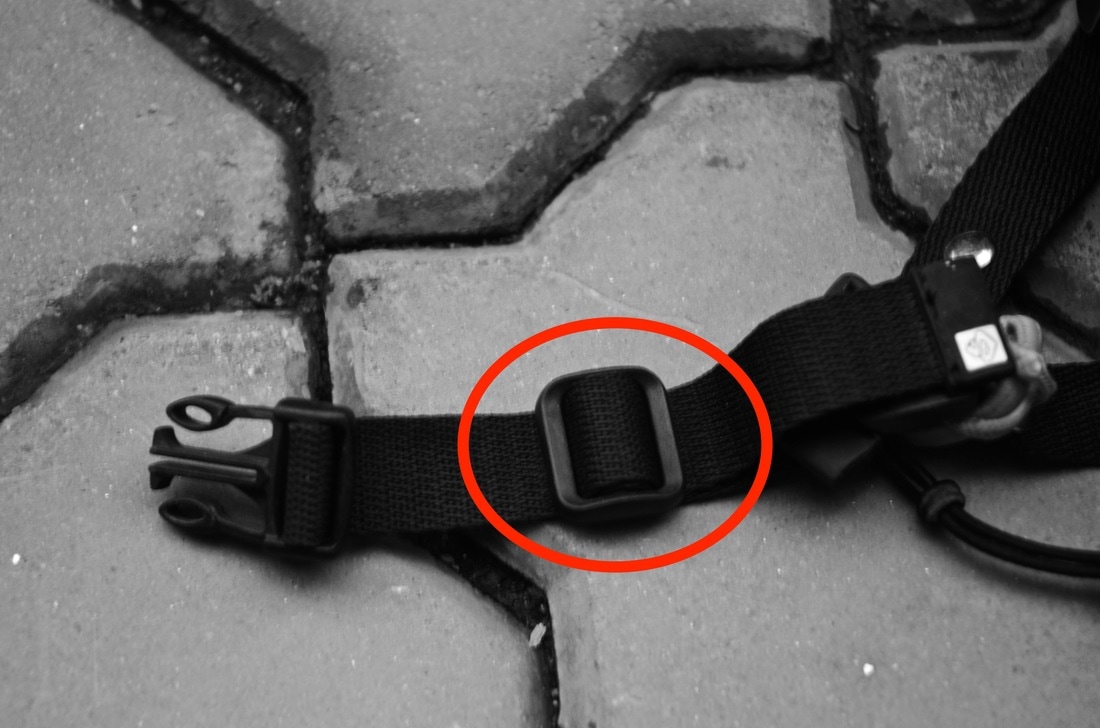 Image showing a back up buckle that will help prevent the chin strap from loosening Full-face:
Some helmet offers full-face protection. While this isn’t something I have ever opted for I would recommend this for anyone that has trouble tucking in when the roll or anyone looking to head down some major slides. Rivers a often remote and ones your face is bust up that’s game over and invariably a long hike out. The down side being that it will restrict verbal communication often cover your ears and mouth. Summary: Don’t cut corners. Spend a little extra getting a good fit and strong helmet that’s fit for your purpose. Written by: Ben Baber When I arrived to Australia I was lucky enough to be shown the Blue Mountains by a great group of people. When Sister arrived, late 2016, I thought it would be the perfect place to take her ans show her the beauty Australia has to offer. I am so EXCITED! The Middle Perlus video has made it into Kayak Session Magazine video of the year award! it is not the best video ever, but we only had an awesome time, and one GoPro between Sam Ellis and I. Part of the judging is based on how many views, shares, and like it gets. So if anyone feels like sharing this link that would be AMAZING!!! A lot of credit for this has to go to CzKiam Ng. Although he wasn't there on the day he made this descent possible in many ways! Grand Canyon in the Blue Mountains. I took my sister through this stunning canyon. It's a great canon for beginners starting with a short 17m abseil in and a few cold swim after that. 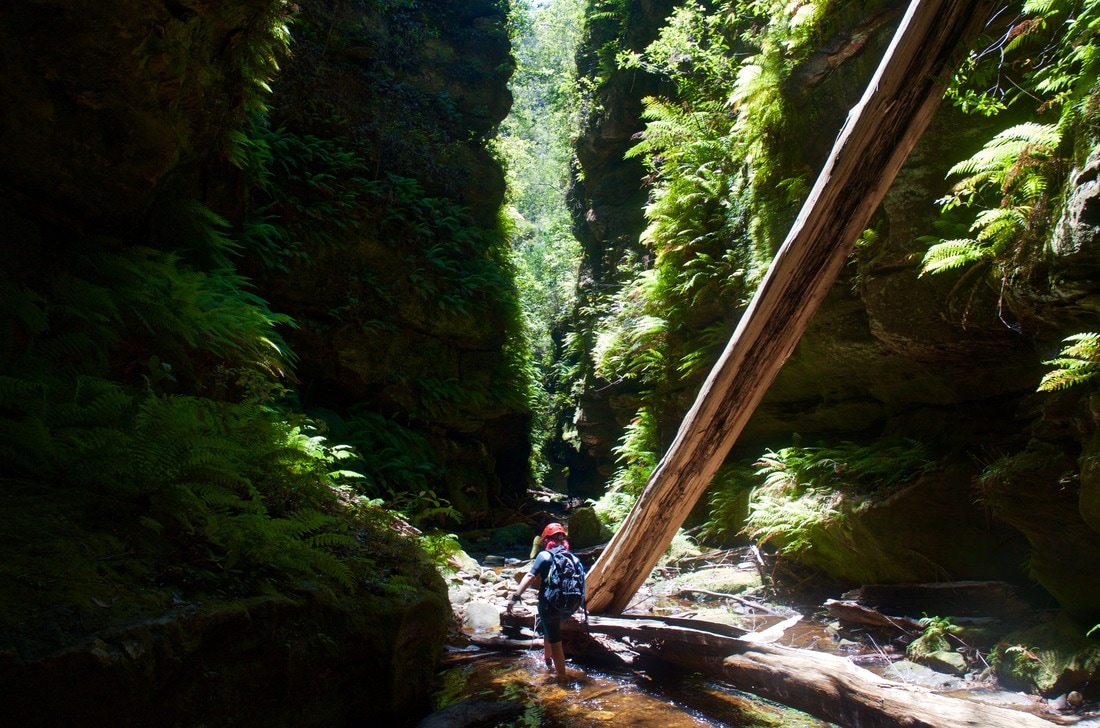 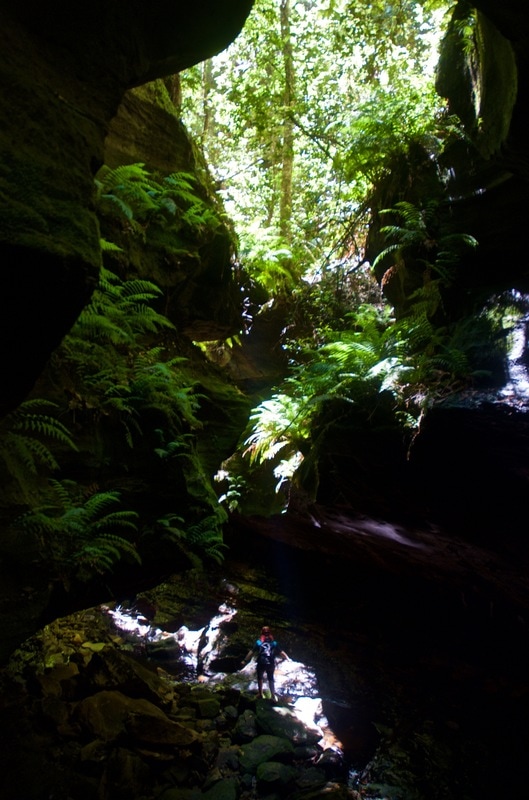 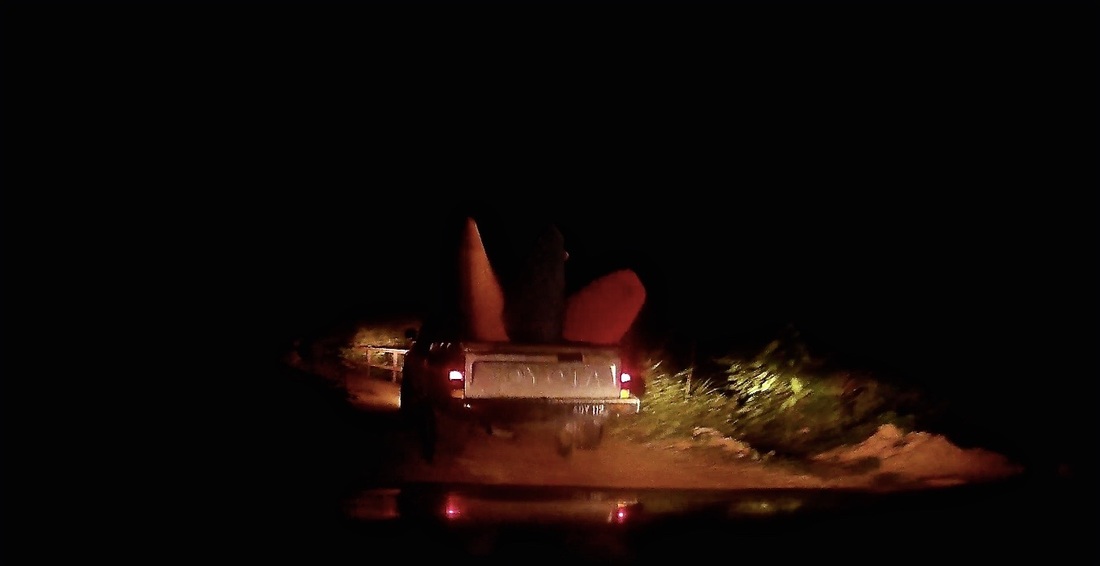 The force that drags me over the edge is the unknown. The bountiful unexplored whitewater rivers of Malaysia have kept me here and continue to do so. Currently injured I have been reflecting upon one of my favorite river, the Perlus. Here’s the story of how we became acquainted. Kayaking trips are never easy in Asia, and the accumulation of mishaps and false starts of this trip somehow resulted in a pinnacle trip that perfectly sums up my kayaking career in Asia The Plan was simple, head to north Malaysia, spend the weekend scouting a new river called the Perlus. However, as with all the best laid plans it didn’t end up being quite so simple. One mishap after another saw Friday and Saturday slim away and as Saturday night began to draw to a close the trip was propelled into action, Ck turned up to the camp like a man on a rampage. It was sometime after 22:00 when we finally left for the Perlus. Arriving in the small villa of Kampar Lasah brought a wave of excitement over all of us. Here we met with our 4x4 shuttle. After transferring the kayaks we began the jarring 3-hour dirt-road journey. The road, as all jungle roads here, was created for logging and subsequently has been torn up by tucks burdened with towering loads of pricelessly aged trees and lost ecosystems. We arrived at the start point shaken and tired. With hugely steep banks either side we set up camp by the side of the road. With spray decks for beds and we settled down for what we knew wasn’t going to be a good nights sleep. There was much contention between the squealing wild bores and bastard logging trucks, blaring their horns as they thundered past, as to who could keep us awake. 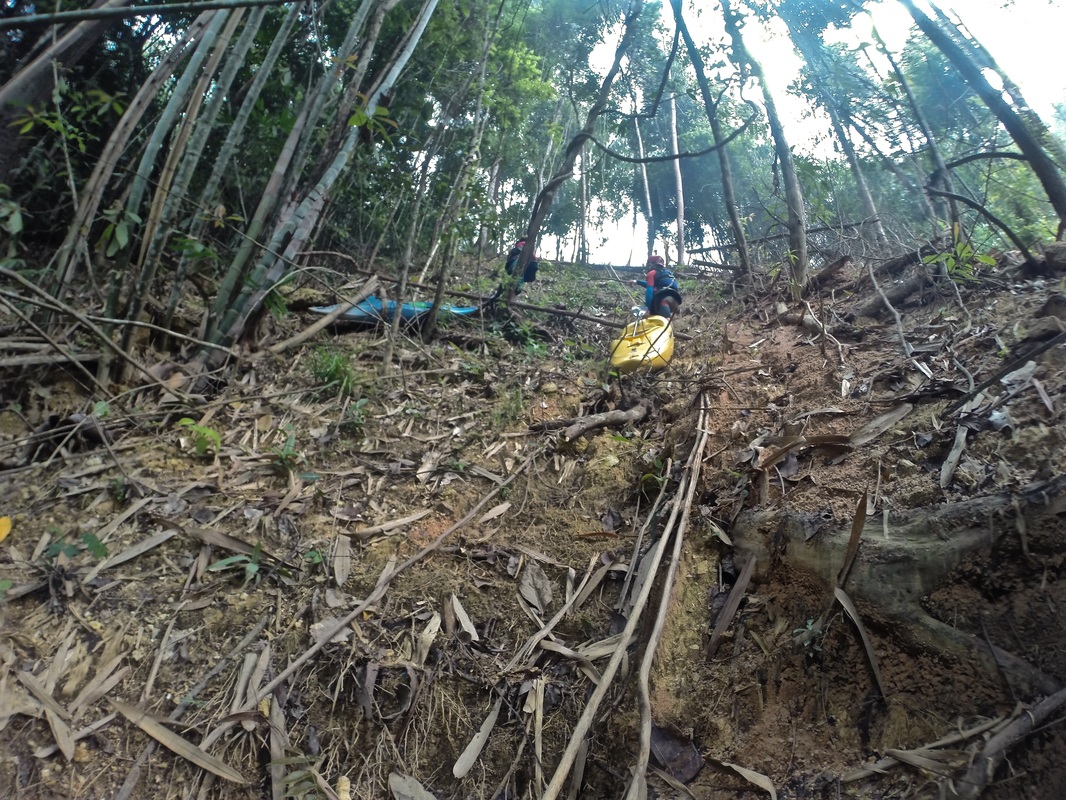 As the sun rose and beams of light squeezed past the thick haze we rose, bent and broken the night. Croissants for breakfast added a brought a bit more class to the proceedings. 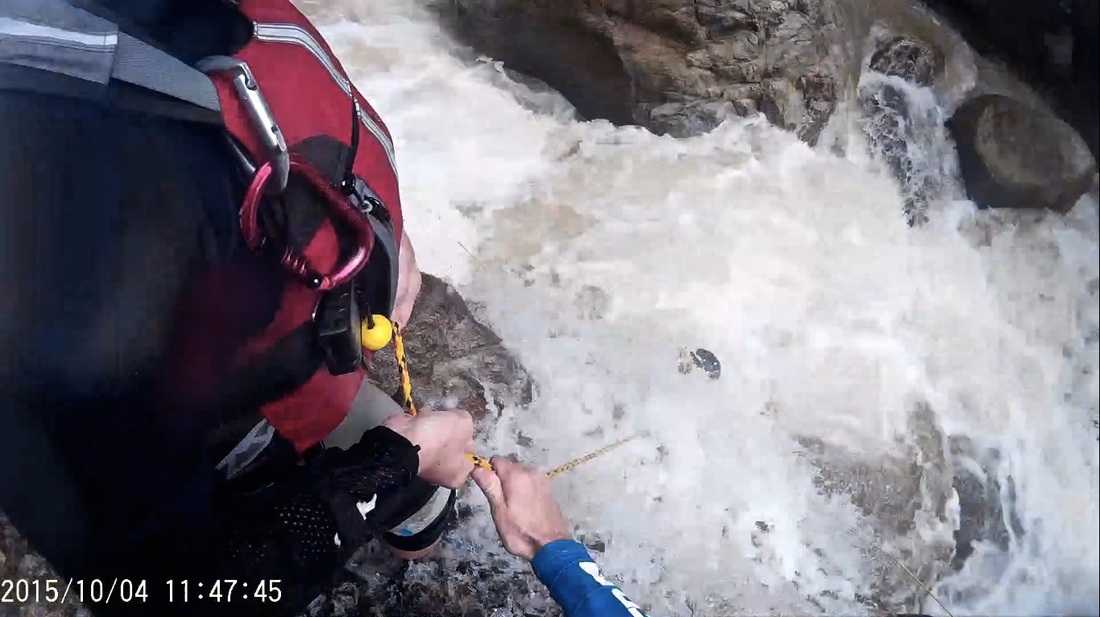 Kayaks packed we headed down to one of the smaller tributaries leading into the Perlus. After a scramble down the bank we dragged our kayaks through the small tributary, little did we know there was a 100meter waterfall between us and the PerlusL Not being able to see around the corner and fearing more treacherous terrain we decided to ascend out. An hour of haling later after hauling our kayaks up mud stricken banks we hiked to the next point of egress, which also happened to be a 50 degree incline several hundred meters above the river. After almost two hours of descending down the bank on makeshift abseils the river was insight, and spirits rose. Few feelings can match the site of a horizon line on a first descent. It wasn’t long before we met ours. After a good scout CK eagerly paved the way, overshooting the line and ending up in an eddy with no option but to hike out and retry. The next attempt saw CK making it down unscathed (just). I was up. We had seen this was a rapid not to take lightly with undercuts on both sides. There was a clear line to make. Still I find it is best not to fixate on what can go wrong too long and just go for it. With a thud, splatter, and bit of luck I nailed the line. Roy followed. With a shaky start going into the drop his was way off line, the water pushed him towards the bank on river left and with a blink of the eye her was pinned, almost instantaneously he was submerged in a barrage of whitewater. Ck and I throw our throw ropes from the bank, but we were helpless to do much more. We felt a Roy pull on Ck’s rope but every time we pulled it would slip out of his hands. After a minute panic swept over me that I have never felt before, I knew that Roy’s life was in the balance, but there was little else I could do without becoming a victim too. Another 30 seconds passed, as did plenty of stupid thoughts as to how I could help. Then, Roy’s helmet emerged. He twisted and thrusted pulling himself free. As he freed himself the next feature sucked him under again. He finally emerging and the famous 'Roy smile' was no where to be seen. Our thought soon turned to recovering the kayak and the two throw-ropes. After a few hours we had recovered one throw-rope, set multiple different pulley systems, all of which failed. There was talk of having to leave the kayak but, it was soon revealed that Roy had his identity card, wallet, and phone in the kayak. As we rigged the last pulley, Ck and I gave an almighty pull (born of frustration) and the kayak was slung free. 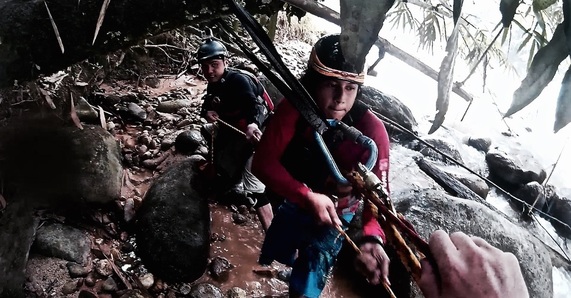 Back on the river horizons came one after the other bringing with them beautiful rapids and waterfalls. It was better than we ever could have imagined. 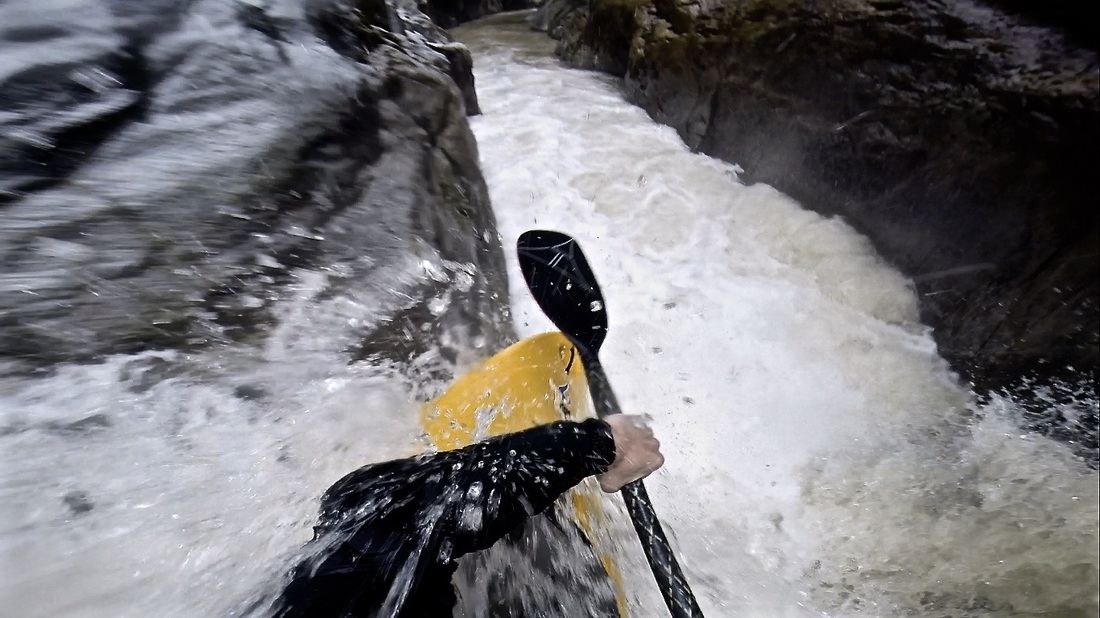 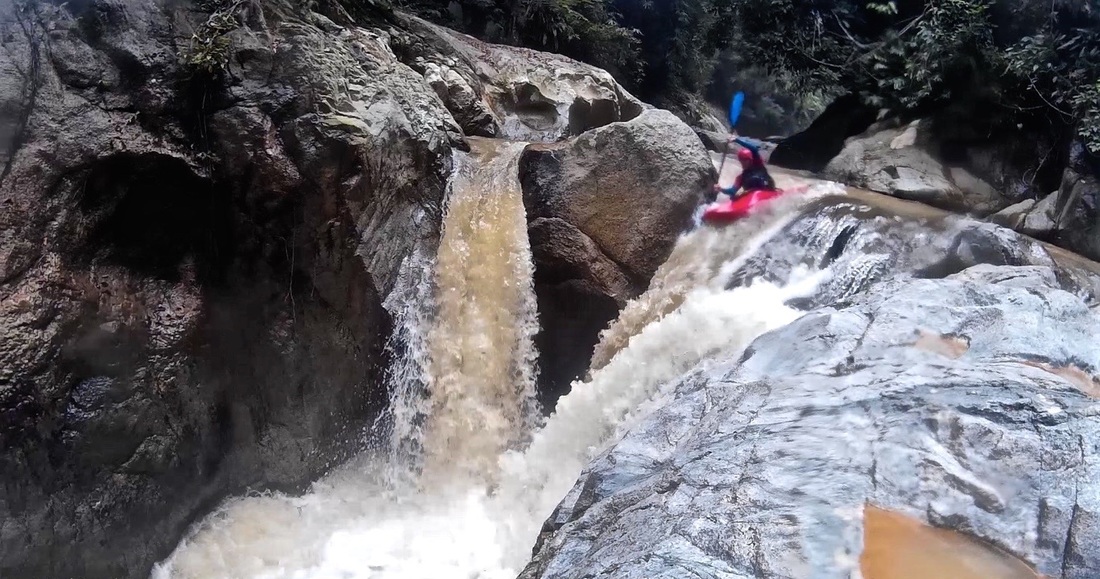 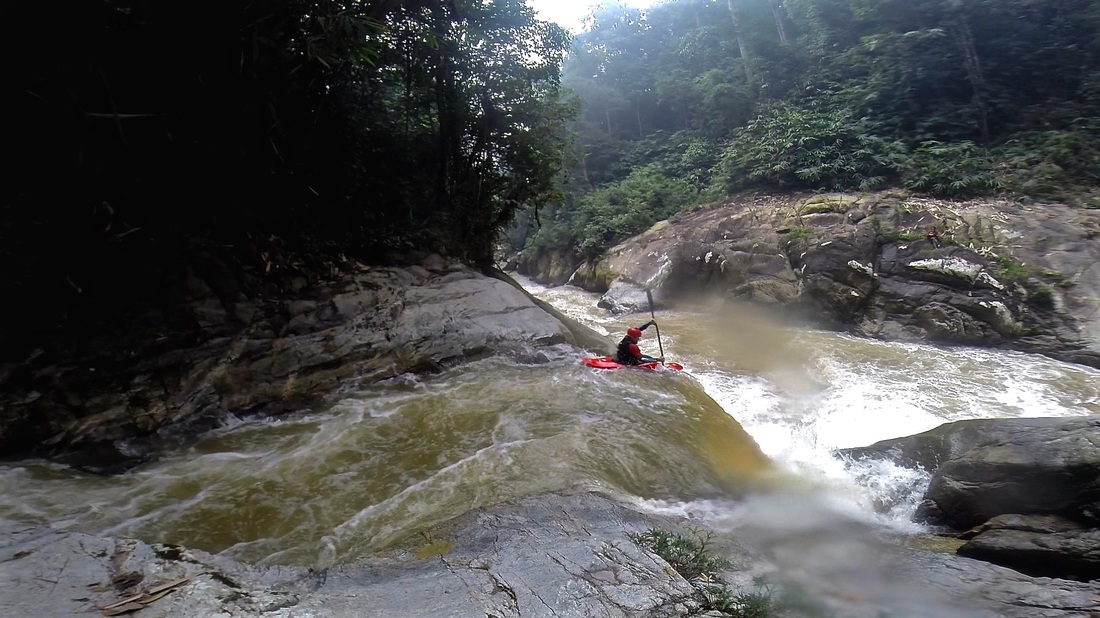 A memorable moment for Ck was at the top of a waterfall. Ck's kayak was lined up ready for the seal launch, if somewhat precariously, so with care he lowered himself into the cockpit. However, the small motion of reaching forward to put the deck on was just enough to nudge his kayak off the edge, forcing him to commit to running the waterfall with do spray deck on. As he came to the edge he let out a thundering war cry “ahhhhh!”. His boat resurfaced full with water. Reluctant to leave it he was swept over the next waterfall where he was finally forced to swim. Still on of the funniest swims I have ever seen. As the day went on constant scouting took its’ toll, draining our time and energy; You can imagine big storm clouds in the distance brought with them mixed emotions. Every kayaker wants more rain, but perhaps not under these circumstances. A 15 minutes downpoor had completely changed colourof the river and doubled its' size. We came upon a huge tree blocking the river and knew we would have to walk around this death trap; we took the opportunity to walk a few hundred meters down the river. At this point the river turned into a gorge with no way out once your on the river. Before long we came across another waterfall bursting at the seems from the recent downpour, and around the corner…. who knew. There was nothing for it but to hike out. Coming to this realization the three of us stood there staring at the daunting mountain we would now have to hike up, not a huge problem in itself, but when you add three heavy kayaks, no sleep, one near death experience, and a day of kayaking it seemed insurmountable. With no end point in sight after an hour of hauling the kayaks up through thick mosquito infected jungle it was safe to say we had all hit rock bottom. It was some time before we hit the road again, but the feeling of relief was unforgettable. A real overload of emotions for all. There you have it, the story of my first, first decent in Malaysia.
Ingredients:
Plain flour- 2 cups (roughly) Dry yeast – 1 sachet Water (warm if possible)- 1 large cup olive oil - tablespoon salt (Kosher or sea) -teaspoon Sugar- 1 Pinch Utensils: Mixing Bowl- 1 Large Pan (the thicker the base the bottom; this will help to displace the heat and cook the bread more evenly)- 1 Method: Pour the flour into a large bowl. Create a well in the centre of the flour. Add the sugar, two pinches of salt, olive oil, and dry yeast (adding a bit more yeast I’ve found helps the bread rise more when cooking it in a pan). Add all the water at once into the well as much as possible; mix with one hand or a wooden spoon adding flour as needed. I’ve found creating a wet dough at first helps to create moist bread. The end result should be light a fluffy (sticky when puled apart). Transfer the dough into the pan (cover the pan with flour so the dough doesn’t stick) you’re going to cook it in; Place the lid on and allow it to rise in the sun or a warm place; min 1 hour. This is vital, as transferring the bread will ruin it. Once risen place it on a low heat and cook to your satisfaction. I like to sprinkle salt on the top with rosemary or something like that. |
InspirationThe Edge... there is no honest way to explain it because the only people who really know where it is are the ones who have gone over. |


 RSS Feed
